|
I love teaching! It’s great to be able to share what I know, and a wonderful bonus when one of my students teaches me something. About a year ago I wrote a blog post, “Spreadsheet Magic - Importing Data from Ancestry.com.” Importing data from a website into an Excel spreadsheet can give you the chance to play around with it, make notes, and manipulate the data to help to see patterns and find more about your ancestors. I demonstrated this at a recent presentation I gave at King County Libraries, and Marvin, one of my students, taught me a new trick. Seems my way of importing is “so 2016.” There a new tool on the block, Power Query, that whittles the importing process down to one quick step. Power Query is a Microsoft tool, included as part of Excel 2016 and available as a downloadable add-on for Excel 2010 and Excel 2013. You can download it here: Once you install Power Query on your computer, it will show as a new tab on the Ribbon at the top of your Excel Window. When you open that tab, you will see several icons. In the left most section, “Get External Data,” there is an icon, “From Web” which will allow you to import data quickly from a web page. 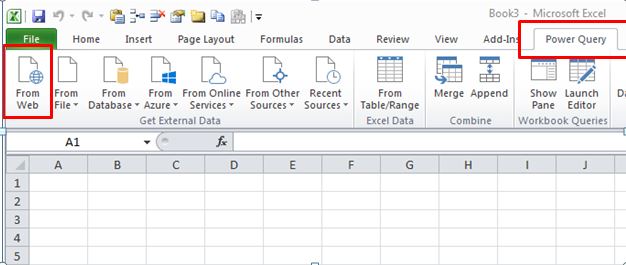 I am curious why my husband’s Irish immigrant ancestors settled in Madison County, Ohio in the early 1850s. If I research some of the early Irish settlers in that community, those who were born in Ireland and lived in Madison County by 1850, I may find one who was from the same place as Mark’s great-great grandfather, Bartley Roddy. I’d like to do a search on Ancestry to find a list of these people, and then use a spreadsheet to track and study them and record my research notes. I did a search on Ancestry for everyone born in Ireland and living in Madison County, Ohio listed on the 1850 census.  I could type all that data in, but it would take me quite a bit of time to record all 130 names. But with Power Query, I can copy the URL from the top of the page and get a direct import of the first 50 names. (For the remaining names, I can copy the URLs for the second and third pages of results, and repeat the process explained below) To do the import, open up the Power Query tab, click on the “From Web” icon, and a pop-up window appears with a box where you can paste in the URL you copied from your Ancestry search. 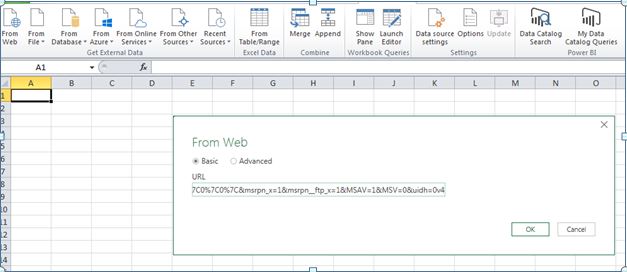 Click OK. A new pop-up appears where you can click on “Table 0” and the “Load” icon at the bottom. 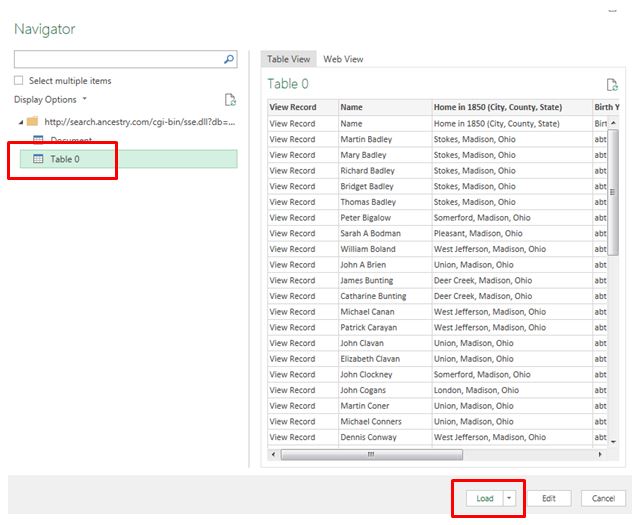 And voila!!!! An Excel table I can sort, filter, and manipulate to my heart’s content with space to record my findings. I’m going to crack those Roddy origins, yet! 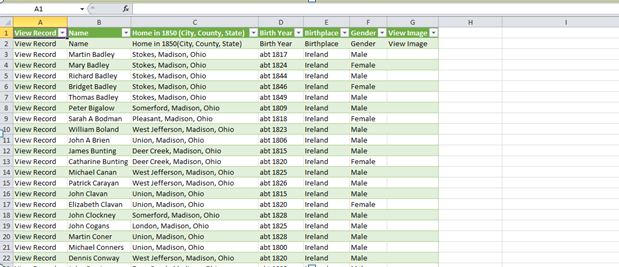 Have fun importing web searches of your own. And thank you, Marvin, and all my other class participants who have taught this teacher such great stuff!
9 Comments
In your spreadsheets, it's nice to sometimes have a heading situated above multiple columns. It makes things easier to read, and makes your spreadsheets look more professional. Here's how to do it. Highlight the cells you want the heading to span. In this example it is B12..C12. On Home tab, Format, get dropdown to Format Cells and the box shown will appear. On Alignment tab, Text alignment, Horizontal, click on Center Across Selection. Excel will create one cell and center the text in that cell. If column widths are later adjusted, the text will still be centered over the desired columns. 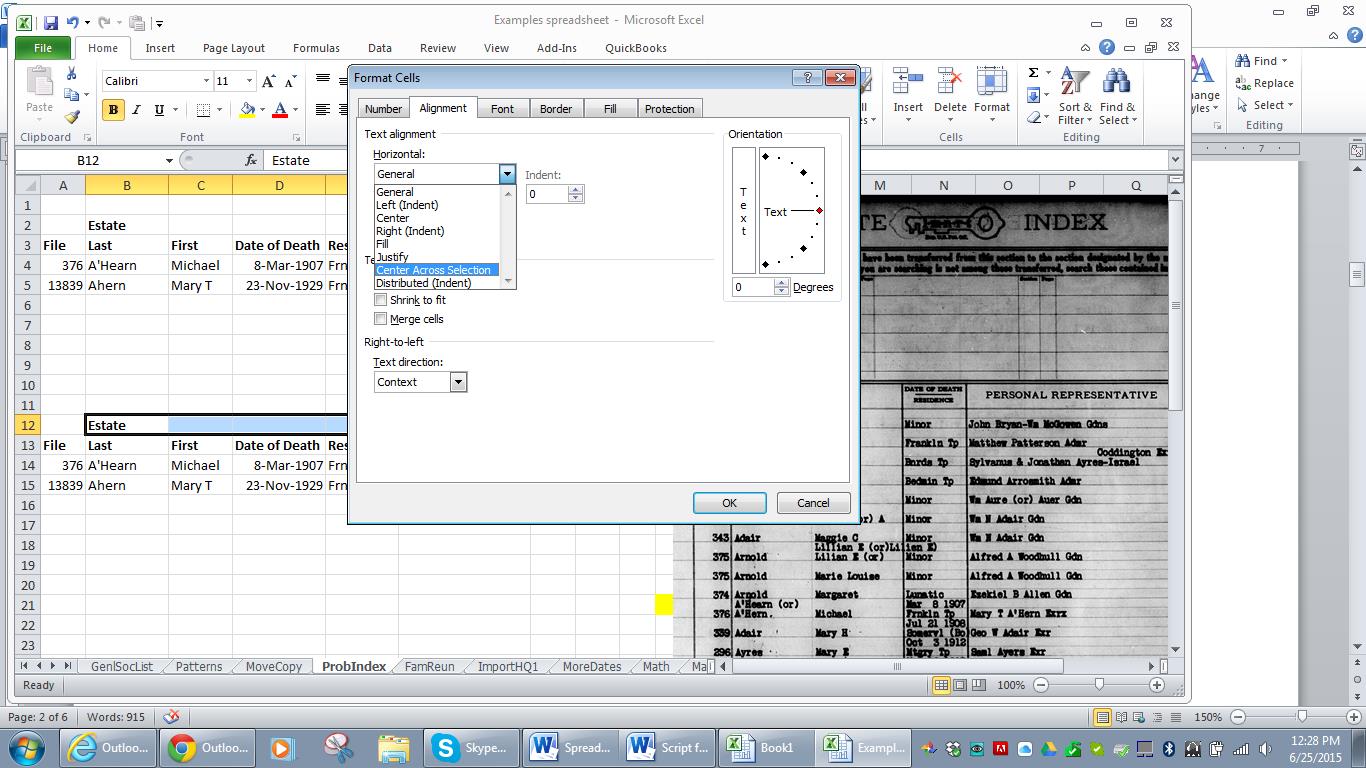 Easy peasy. How will you use this in your spreadsheets? There’s a simple way you can make your ancestor’s timeline more interesting and more useful. Add hyperlinks! If you’re like me, your timelines probably include dates when your ancestor appeared on a census, when he showed up in a city directory, when he was naturalized, in addition to when he was born, married and died. I also like to throw in every newspaper article I can find about my ancestor. I try to save images of these documents to my computer, either in a jpg or a pdf file. Then when I create a timeline in Excel I can link to the image of the document. I’ll admit, I’ve looked at these documents many times, but once in a while something pops out that I hadn’t noticed before or that I hadn’t really focused on. And I find that the organization of a timeline gets my brain processing information in a different way than if I’m looking at a stack of papers in a file/ Looking at these images in the context of a timeline might just help me make new discoveries in the old documents. Here’s how: Right click on a cell where you want to link to a document image. A dropdown menu of options including “Hyperlink” will appear. 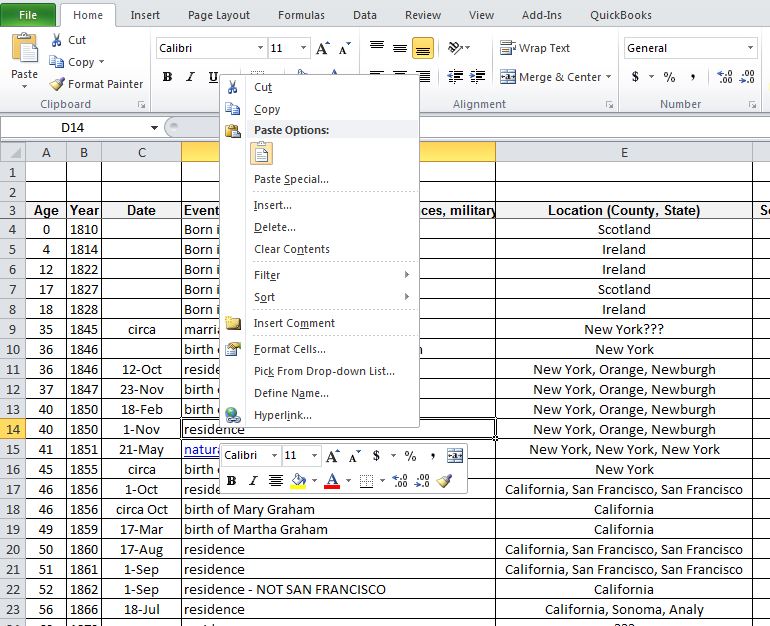 Select a file from your computer and click “OK.” That’s all there is to it. Next time you hover over that cell, click when the pointing finger icon appears and you’ll see the document. Easy peasy. 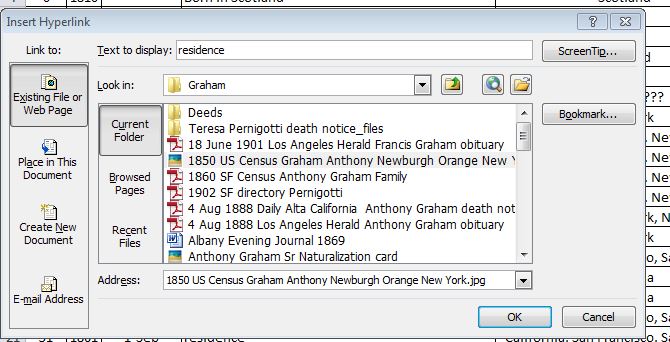 This makes a simple way to share information about an ancestor with your family. Send them a timeline and the image files and they can see what their ancestor was up to. 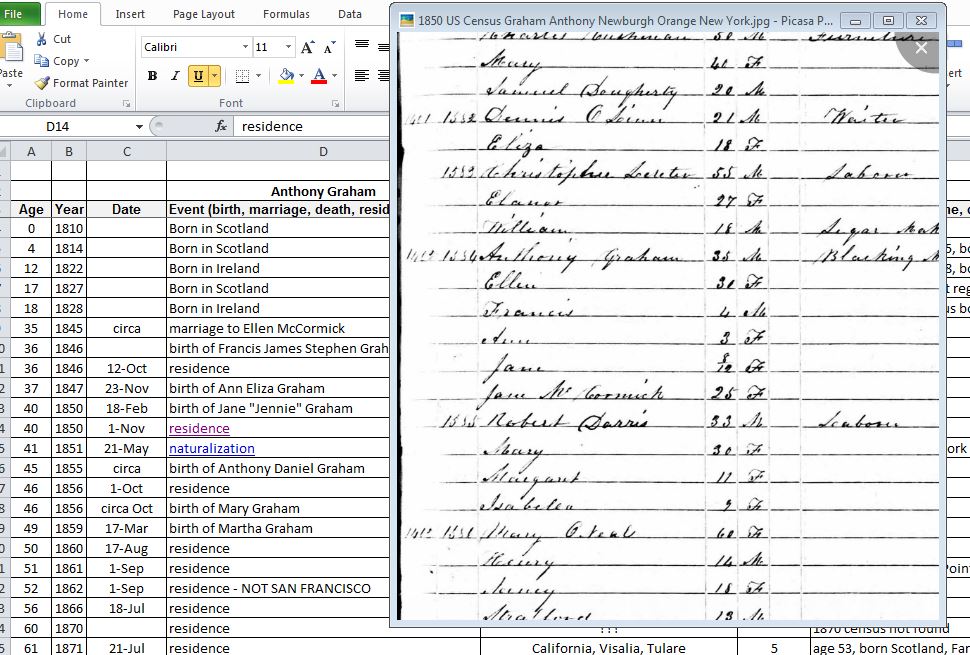 Whose timeline will you hype up first? 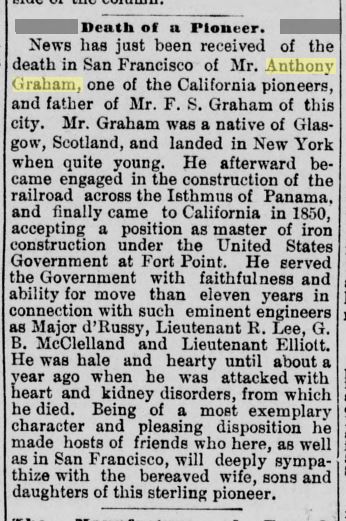 "Death of a Pioneer" Los Angeles Herald, 4 Aug 1888, page 2, col 3 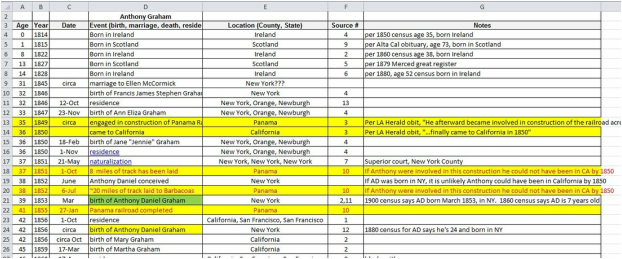 I’ve been working on a timeline of a potential relative, Anthony Graham. He’s not a direct ancestor, and he may or may not be a relative, but I’m hopeful that tracing him will help me learn more about my great-great grandmother, Jane Graham Ahern. (Long story about why I think he might be related. I’ll save that for another blog post.)
I’ve been trying for years to come up with a specific birthplace for Anthony. I have some census records that have a mix of “Ireland” and “Scotland” as a birthplace. I can find him on the 1850,[1] 1860[2] and 1880[3] US Federal census and all of them show he hails from Ireland, but on the 1880, 1900 and 1910 censuses, most of his children report that their father was born in Scotland.[4] And one daughter, Jennie, can’t seem to make up her mind – in 1880 her father is born in Scotland and her mother is born in Ireland,[5] while in 1900 Da’s from Ireland and Ma’s the Scot.[6] Anthony’s death notice in the San Francisco paper indicates he was a native of Scotland,[7] but obviously he didn’t write that, and due to the 1906 earthquake and fire, no death certificate exists to provide additional information. And then I found it! Another obituary, from the Los Angeles Herald. “Death of a Pioneer… Mr. Graham was a native of Glasgow, Scotland.” [8] A city! There were more details. He “… landed in New York when quite young. He afterward became engaged in the construction of the railroad across the Isthmus of Panama, and finally came to California in 1850.” Now it was time for me to enter these items on his timeline. And that’s when the whole thing fell apart. Anthony’s timeline shows four children born in New York - Francis in 1846,[9] Ann Eliza on 23 November 1847,[10] Jennie on 18 February 1850[11] and Anthony Daniel in 1853.[12] The sentence construction in the obituary infers he was engaged in the construction of the Panama Railroad prior to his arrival in California in 1850. If that is true, it is unlikely that he could have fathered Jennie in 1850 and Anthony Daniel three years later if they were born in New York. When I looked at the timeline of the Panama Railroad, even more inconsistencies arose. Construction of the railroad did not effectively begin until May 1850 and the railroad was not completed until 27 January 1855.[13] It would have been difficult for Anthony to become engaged in the construction of this railroad if he were in California by 1850. Integrating the Los Angeles Herald obituary details into the existing timeline I had for Anthony points out some problems with the information provided. Since the dates seem “off” I have to question the other details in the obituary. I don’t know who provided the details to the Herald, but it was likely his son Frank who is mentioned in the article. Based on his census records, Frank seems clear that his father was born in Scotland, but if Frank is wrong on the dates of Anthony’s movements, could he be wrong on the birth place as well? Try using a timeline in your own research. It might help you to see some inconsistencies in your data for your own ancestors as well. How have timelines helped you? Please leave a comment below. [1] 1850 U.S. census, Orange County, New York, population schedule, Newburgh, p. 106 (stamped), dwelling 1402, family 1584, Anthony Graham; digital image, Ancestry.com (http://www.ancestry.com : accessed 28 September 2016); citing NARA microfilm publication M432, roll 573, page 106A, image 218. [2] 1860 U.S. census, San Francisco County, California, population schedule, San Francisco, p. 218 (penned), dwelling 1851, family 1876, Anthony Graham; digital image, Ancestry.com (http://www.ancestry.com : accessed 28 September 2016); citing NARA microfilm publication M653, roll 67, page 383, image 383. [3] 1880 U.S. census, Tulare County, California, population schedule, Visalia, p. 21 (penned), dwelling 226, family 230, Anthony Graham; digital image, Ancestry.com (http://www.ancestry.com : accessed 28 September 2016); citing NARA microfilm publication T9, roll 85, page 48A, ED 098, image 482. [4] 1880 U.S. census, Los Angeles County, California, population schedule, Los Angeles, p. 10 (penned), dwelling 92, family 95, Frank Graham; digital image, Ancestry.com (http://www.ancestry.com : accessed 28 September 2016); citing NARA microfilm publication T9, roll 67, page 224B, ED 025, image 151 [5] 1880 U.S. census, Merced County, California, population schedule, Merced, p. 11 (penned), dwelling 110, family 113, Edward Tobin; digital image, Ancestry.com (http://www.ancestry.com : accessed 28 September 2016); citing NARA microfilm publication T9, roll 68, page 345C, ED 043, image 711. [6] 1900 U.S. census, San Francisco County, California, population schedule, San Francisco, p. 5 (penned), dwelling 72, family 79, John O’Gara; digital image, Ancestry.com (http://www.ancestry.com : accessed 28 September 2016); citing NARA microfilm publication T623, roll 105, page 5A, ED 0204. [7] “Died (Graham),” (San Francisco.) Daily Alta California, 4 August 1888, p. 7, col. 6. [8] “Death of a Pioneer,” Los Angeles (California) Herald, 4 August 1888, p. 2, col. 3. [9] 1850 U.S. census, Orange Co., New York, pop. sch., p. 106, dwell. 1482, fam. 1584, Anthony Graham; 1860 U.S. census, San Francisco Co., California, pop. sch., p. 218, dwell. 1851, fam. 1876, Anthony Graham [10] Baptismal record for Ann Eliza Graham, St Patrick’s Catholic Church, Newburgh, Orange, New York [11] Baptismal record for Jane Graham, St Patrick’s Catholic Church, Newburgh, Orange, New York [12] 1850 U.S. census, Orange Co., New York, pop. sch., p. 106, dwell. 1482, fam. 1584, Anthony Graham; 1860 U.S. census, San Francisco Co., California, pop. sch., p. 218, dwell. 1851, fam. 1876, Anthony Graham [13] “Panama Canal Railway,” Wikipedia.org (https://en.wikipedia.org/wiki/Panama_Canal_Railway : accessed 28 September 2016). It’s great to be able to do a search in a database and input the results into a spreadsheet for further analysis. Once you have the data in your spreadsheet you can sort and filter it to your heart’s content to crack it open and find the patterns that will help you breakdown your brick walls. Some websites such as FamilySearch will allow you to directly export from the website into a spreadsheet. I have written about this on my blog at http://www.mkrgenealogy.com/searching-for-stories-blog/the-importance-of-exportance. With other websites, such as Ancestry.com, you can use the “Get External Data from Web” feature on the data ribbon to import the data into Excel. I’ve explained how to do this on my blog at http://www.mkrgenealogy.com/searching-for-stories-blog/spreadsheet-magic-importing-data-from-ancestrycom But some websites have a “captcha” which foils the import using the Get External Data from Web feature. Yes, you can copy the results from your database search into Excel, but it will drop everything into Column A, with parts of each individual record on separate lines. One name record might occupy 4 lines, cells A1, A2, A3, and A4. The next record occupies A5, A6, A7, and A8. So then you get to spend the next hour or more copying the contents for each record into separate columns. Definitely not fun! I have discovered a magic way to separate those rows into separate columns. Fast. Super fast! Here’s how: My example uses the website IrishGenealogy.ie. This same procedure will work with any search where the results get dropped into one column in an Excel spreadsheet. You can play along with my example. Step 1: Perform your search on the website. Go to https://www.irishgenealogy.ie Select Church records. To play along type in First Name: James, Last name: Ahern, Location: Cork and Year range: 1830 – 1830, as shown in the illustration below, and click “Search.” 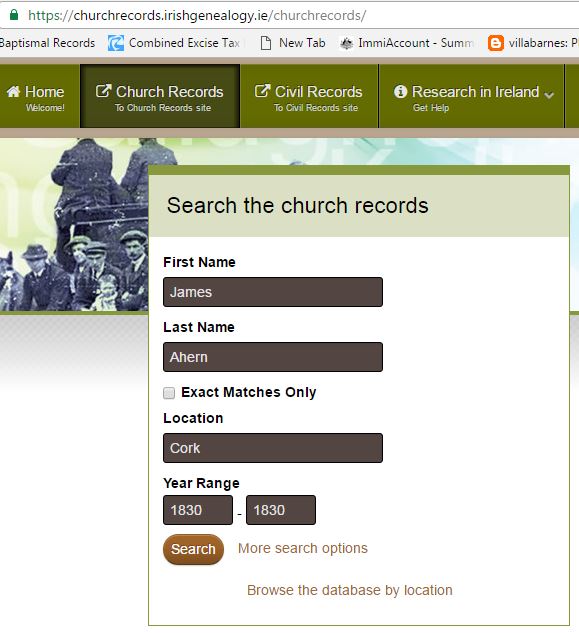 Step 2: My search gave me 10 results – 7 baptism and 3 marriage. For ease of illustrating my example, I filtered out the 3 marriage results, leaving only the 7 baptism results. (When you’re doing this on your own, feel free to grab all the data you want, but for my example I’m going to limit it so we won’t have an overwhelming amount of data to deal with.) Just click on the word “Baptism” on the left side of the screen. Now you should have 7 results of only baptisms. See the "Before filtering" and "After filtering" illustrations below: 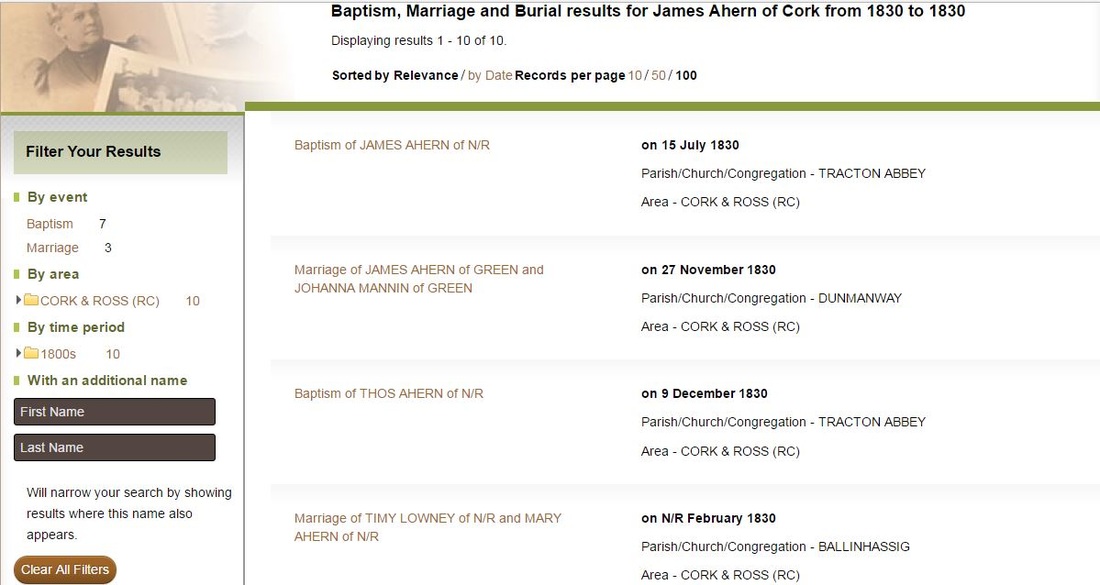 Results before Filtering 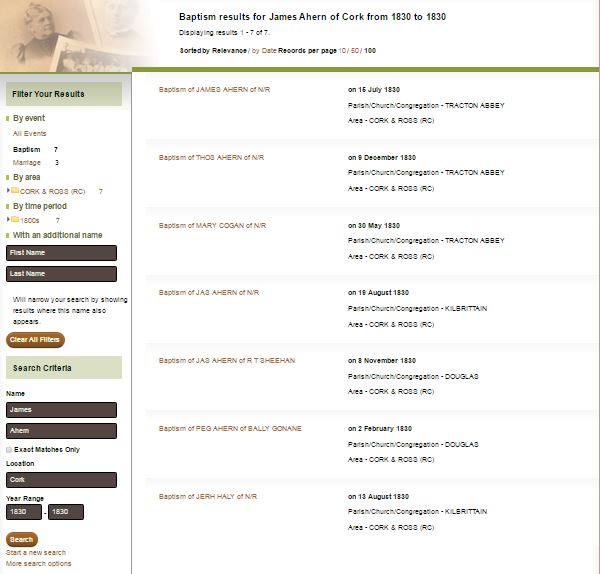 Results after filtering for Baptisms Only Step 3: Highlight and select your results to copy them. I find it easiest to start from the bottom of the list, left mouse click and work my way up to the top of the list. Once you have your results highlighted click Ctrl + C to copy 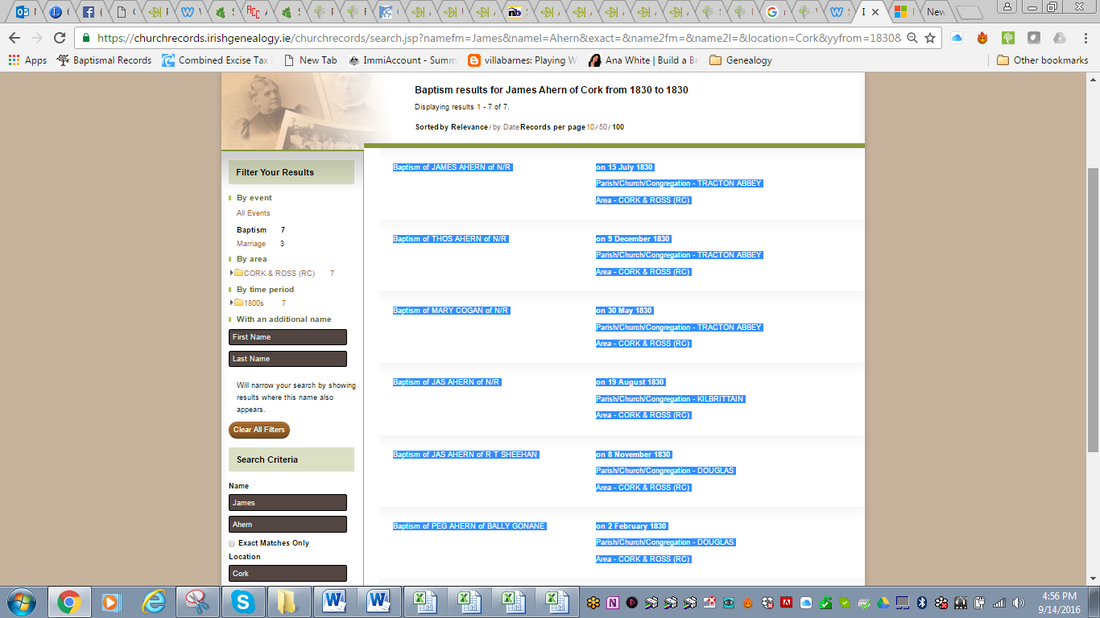 Step 4: Now you are ready to paste into Excel. To do this, open up a worksheet, put your cursor in cell A1, click the little triangle below the word “Paste” and select "Paste Special – Text." Click OK 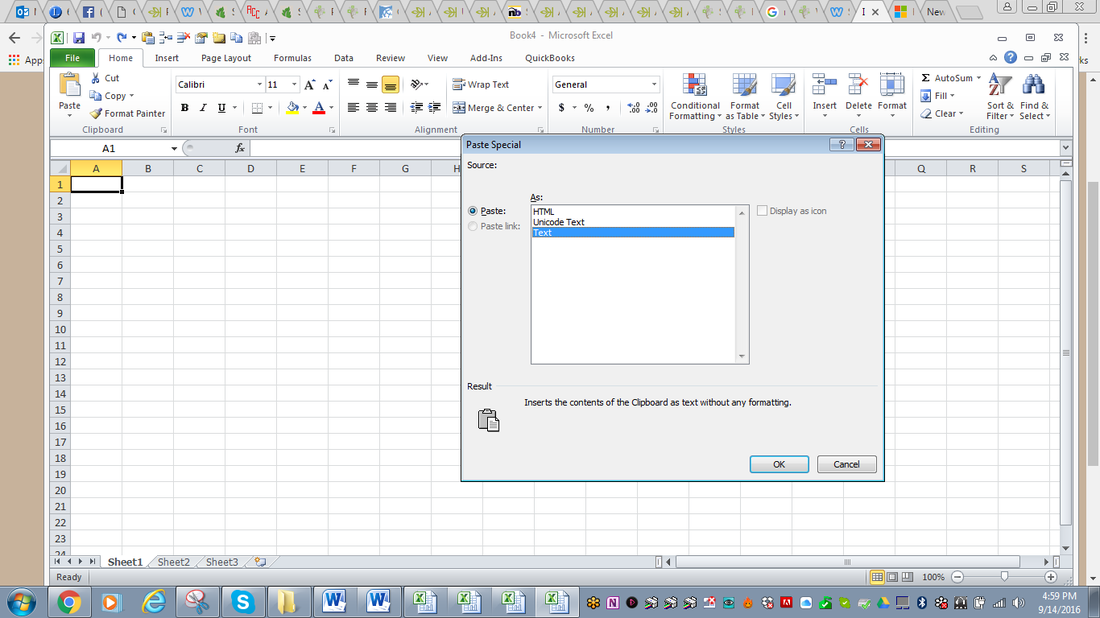 Your worksheet will now look like this: Note that everything is in Column A. 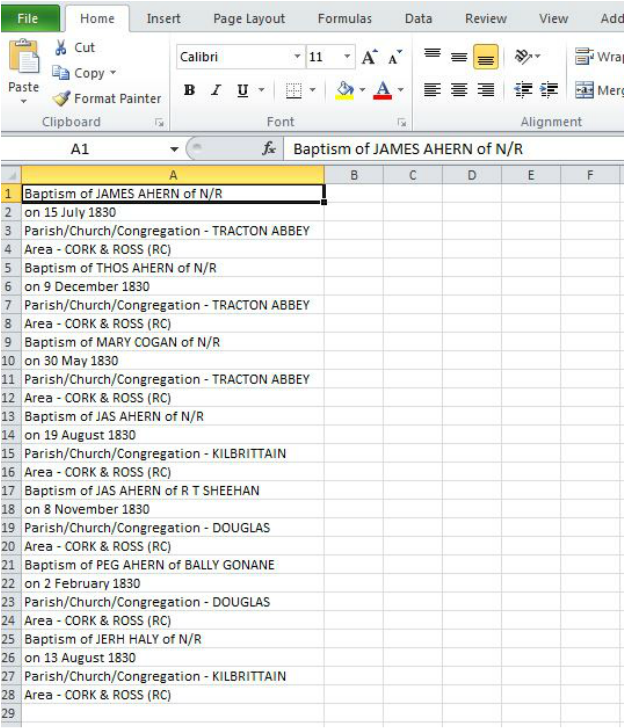 . Step 5: Here’s where the magic happens! In cell C1, paste the following formula: =OFFSET($A$1,(ROW()-1)*4+INT((COLUMN()-3)),MOD(COLUMN()-3,1)) You can see how that has copied the contents of cell A1 into C1. 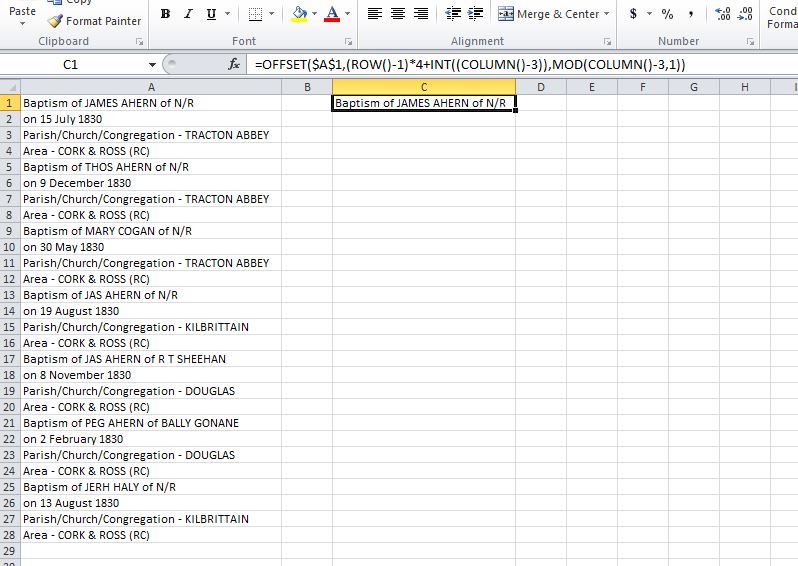 Step 6: Now copy that same formula from C1 and paste it into cells D1, E1 and F1. Widen each of those columns to fit all the data in them. See illustration below:  Step 7: Now copy cells C1-F1 and paste them into cells C2 to C10. After you click enter, your worksheet should look like this: 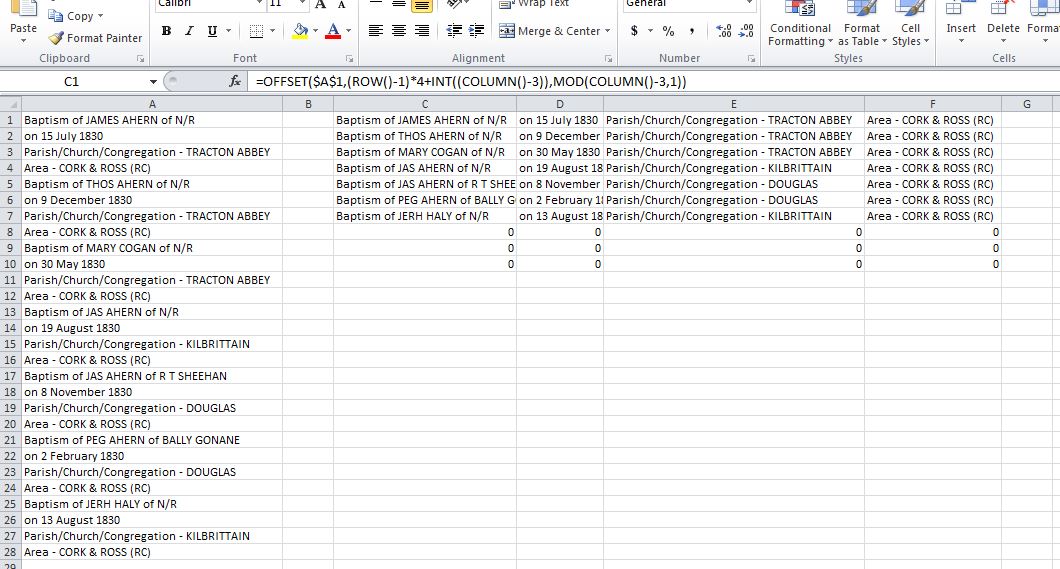 You can see that there are 0s in rows 8-10. This is because we only have 7 sets of records. (I really didn't need to copy all the way down to C10, but I did just to show you that you can paste more than you need and avoid having to mentally calculate exactly what you need.) Step 8: Notice in the image above that the contents of the cells in the worksheet looks like text, but you can see in the function box that it is still a formula. You need to do one more step to turn these cells into true text. Click on the grey square in the upper left corner of the worksheet to highlight the entire worksheet. Click Ctrl + C to copy everything. In a new worksheet, (ie Sheet2) click on cell A1, click the triangle below the word “Paste” and select “Paste Special – Values.” This turns all the formulas into text. 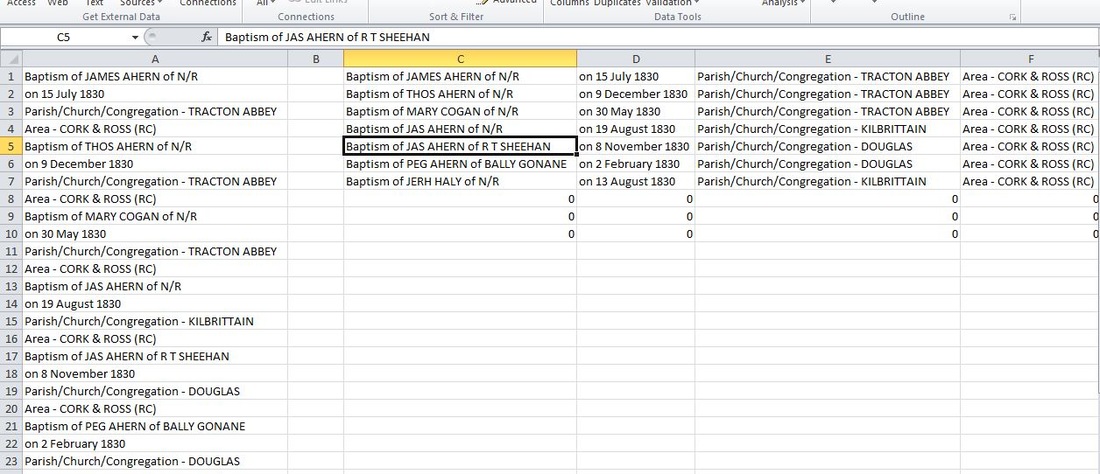 You can see in the function box that cell C5 now contains text, not a formula. Perfect! Then you can use “Text to columns” on the Data tab to split the data in Columns C through F to separate the various words into separate columns as you desire. If you need more instructions as to how to separate Text to Columns, check out my Legacy Family Tree Webinars on Spreadsheets at http://familytreewebinars.com/maryroddy (You'll find Text-to-Columns in my Spreadsheets 201 webinar.) Now that you know how to import data from a website into Excel and NOT have it all dump into one column, how will you use it? Let me know in the comments below. A note on the formula you pasted into Cell C1: =OFFSET($A$1,(ROW()-1)*4+INT((COLUMN()-3)),MOD(COLUMN()-3,1)) The 4 in this formula, indicates that 4 rows of data make one record set. If your data set is a different number of rows, you would need to adjust the formula. According to the Microsoft support website: "This formula can be interpreted as
OFFSET($A$1,(ROW()-f_row)*rows_in_set+INT((COLUMN()-f_col)/col_in_set), MOD(COLUMN()-f_col,col_in_set)) where: f_row = row number of this offset formula f_col = column number of this offset formula rows_in_set = number of rows that make one record of data col_in_set = number of columns of data"[i] [i] Microsoft Support website at https://support.microsoft.com/en-us/kb/214024 Ever create a spreadsheet, enter a whole bunch of data into it, and realize you set it up wrong? That It would be more useful and functional if the rows were columns and the columns were rows? Here is an example. Here I’ve created a spreadsheet to figure out how any people with various surnames lived in a community across various census years. I listed my nine census years down the left hand side to identify the rows, and I put my four surnames as the column headers. Looks great, but what happens when I find more names to research in that community? My table will just get wider and wider, but not get any taller (at least not until they release the 1950 census.) To my eye, short and wide tables just seem harder to read than tall and skinny ones. By this time I’m feeling a bit like a dodo. If only I’d used the census years (there’s a finite number of those) as the column headers and the surnames as the row titles. 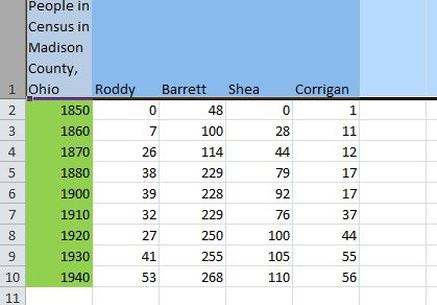 Do I have to retype the whole thing? Nope. I can transpose it. Here’s how… Highlight the table, in this example A1 to E10. Click Ctrl+C to copy. Click the cursor in a destination cell elsewhere in the worksheet or workbook (in this example I clicked in A13). Click on the triangle below the Paste icon, then click “Paste Special” and the box shown will appear. Click on the box next to Transpose. 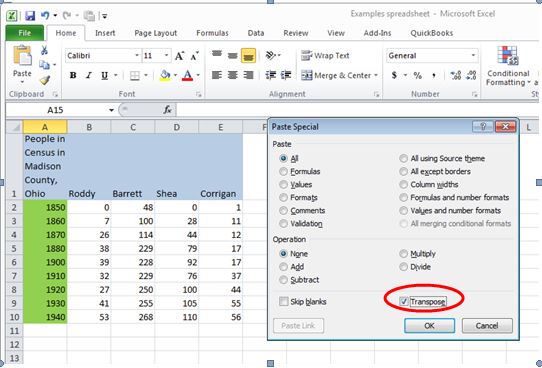 And here's what it looks like after, and I'm ready to enter more data! 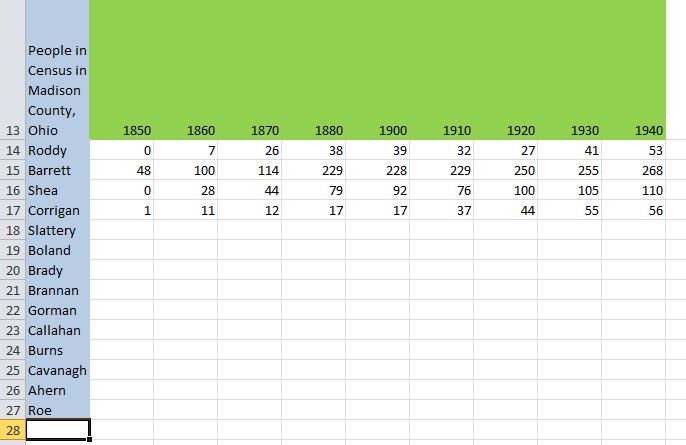 Easy peasy. A few simple steps and now my table looks just like I want it to. And without all that pesky retyping. Yay! Time for more research…
OK, I just made that up - “Exportance” isn’t a real word. But exporting is a real concept, and a very important one at that. Last week on the Tuesday Technique Tips I demonstrated how to import search results from Ancestry.com into an Excel spreadsheet. This week, I’d like to show how to export a batch of results from FamilySearch.org into a spreadsheet. Once that data is in a spreadsheet format you can manipulate and sort and annotate it to your heart’s content. Here’s how… My example below shows a search for surname RODDY with a birthplace of Ohio, and a year range of 1850-1900. I have limited the search to two specific collections – “Ohio Births and Christenings, 1821-1962” and “Ohio, County Births, 1841-2003.” Here is a screenshot of the first few results. FamilySearch allows me to set the number of results to show, either 20, 50 or 75. I always set it at 75 – after all, more results in the bucket means fewer trips back to the well to gather additional data.  Now I have some results which I could begin to type into a spreadsheet - a lot of results, and that means a lot of typing. But watch what happens if I click on the “Sign In” button in the upper right-hand corner of the screen. 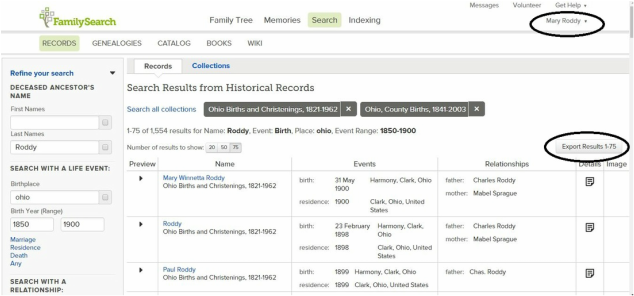 Once I am signed in with my FamilySearch account, the “Export Results 1-75” button magically appears. When I click on that, my results are automatically exported to an Excel spreadsheet that looks pretty much like this: 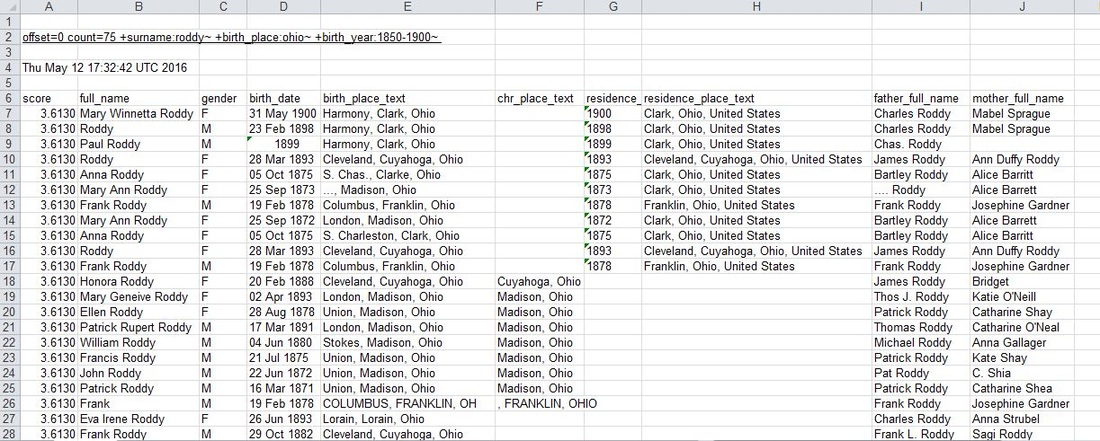 Note that I have widened a few of the columns, and eliminated ones from the export which contained no data. Now I can sort or filter or otherwise manipulate the data to help me in my research on the Roddy family. If I have more than 75 results in my search, at the bottom of the page I can get to the second or later page of results, and import the second batch of 75 into a spreadsheet. It will create a new spreadsheet, but I just copy and paste the results to the bottom of my original spreadsheet. Look at all that data, and hardly any typing involved! I hope this technique helps you speed up your research with spreadsheets. 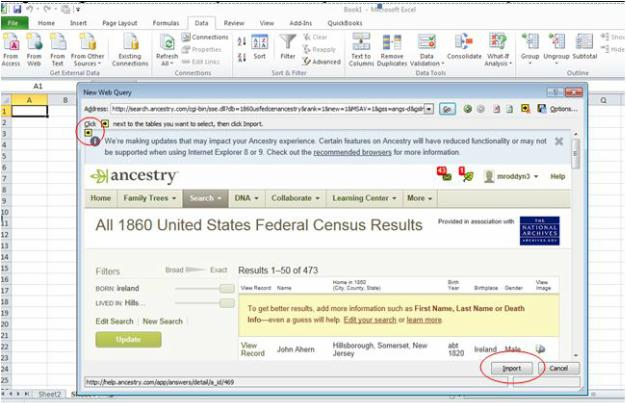 Did you know you can import results from an Ancestry.com search directly into an Excel spreadsheet? Think of the many ways you could use this technique to create a data set and then manipulate it to see patterns in the data. A spreadsheet could be a great tool to study and correlate you ancestor's FAN club - their Friends, Associates and Neighbors.
As an example, perhaps you only know only that you ancestors came from "Ireland." Wouldn't it be nice to be able to narrow that down a bit? Wherever they decided to settle, they didn't do it in a vacuum. They settled there because they knew someone there. If you can figure who the other Irish immigrants were and where they were from, you just might find some clues as to where you ancestor hailed from. Creating a database of people sharing a common place of origin with your ancestor, and then manipulating that database by adding other information to it might just help you to solve your location-of-origin problem. But typing in the names, birth years and other information for every individual with this kind of a common characteristic can be a slow and tedious process. Imagine if there were a quicker way... There is! You can import data from a web search, Here's a step-by-step example showing how to import from a Ancestry.com into an Excel spreadsheet. Step 1 – Do a search on Ancestry.com, for example a search of all the people born in Ireland living in Hillsborough, Somerset County, New Jersey in the 1860 census. Copy the URL from your search. (Note: it is best to get the maximum number of results per page, so set it to display 50) Ctrl+C to copy. Step 2 – If it is a long URL, convert to tinyurl at http://tinyurl.com/ Click on “copy to clipboard” (just beneath the tiny URL that was created). You need to do this step because the URLs for Ancestry searches are really long Step 3 – In the spreadsheet where you want to place your data, go to the Data tab and click on the “From Web” icon. A New Web Query window will open up. Step 4 - Put your cursor in the Address box at the very top of this window and do Ctrl+V to paste the tinyURL in the box. Click the “Go” button to the right of the Address bar. The first page of your Ancestry results will appear. Note – if this doesn’t work, you may need to sign in again to Ancestry within the Ancestry window in Excel (confusing, I know, but I think you’ll get it when you’re working through doing this. And if you're not signed in to Ancestry in Excel, sometimes all the date (like "city" and "gender" won't transfer) Step 5 – At the top left of the search page image (just above and to the left of the i in the picture above), there is a yellow arrow. Click that and it will turn to a green check. Then click “Import” in the lower right corner of the window. Step 6 – A pop-up will appear asking you where you want the data. $A$1 is the default and usually that is what you want Click OK. It will paste a bunch of extra stuff on your worksheet, including rows that you will probably eventually want to delete, but your data will be in a columnar format that you can deal with. To delete the rows above your data range, click on the row immediately above your data range, Shift+Ctrl+Home and it will highlight all the rows above your data range. Then on the home tab, click the Delete triangle, then DeleteSheetRows and it will eliminate all those rows. For subsequent pages of data from Ancestry, on your Ancestry query go to the subsequent page of results, create a new tinyURL for that page of results per Step 2 above, and follow the same process. (You might need to have your cursor in a column to the right of your data area to start the process, but you can specify that you want to paste the data into $A$55 (or whatever cell where it won’t paste over your last import). This technique is great for using with Ancestry.com but will also work with other websites. You might find a database somewhere of all the probates or marriages in a county. Wouldn't it be great to be able to pull the data for the surnames you're studying? The process outlined above might be just the way to do that. FamilySearch.org will also allow you to import data directly into a spreadsheet. I'll cover that process in my Tuesday Tips post next week. See you then! |
AuthorMary Kircher Roddy is a genealogist, writer and lecturer, always looking for the story. Her blog is a combination of the stories she has found and the tools she used to find them. Archives
April 2021
Categories
All

|
